 |
Looks pretty awesome rite? Small presents for my hardworking girls :-)
|
And here it is...my handmade ones. I use colourful ribbons as well as different width. I thought it is more fancy and playful than the one I saw at the store.
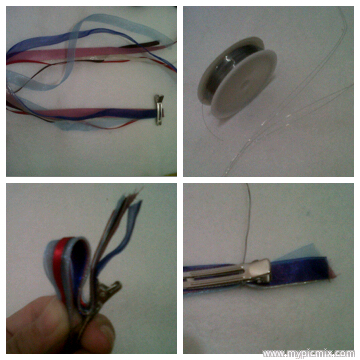 |
| How to read the pic: from upper left to upper right, then bottom right to bottom left |
- different colour of ribbons (try different width and different texture/material). I tried satin, sheer and organza ribbons...too bad I didn't have the ones with pattern on it (time to visit my fav art-n-craft shop to stock my ribbons). I used 5 ribbons. I recommend 3-7 ribbons (for fluffy bows) but it is all depended on the material as well as the width of the ribbons (experiment it all you like, there is no fix formula for cute bows).
- clips (I recommend either grip clip or barrete, instead of alligator hairclip)
- craft wire (you can use thread too but use the strong one)
- glue (better use hot gun glue since it sticks better...a must for my rough and sweating girls)
 |
| Step 3 - 6 |
1. Cut the ribbons into a same length (approximately 40cm...well, I didn't use ruler...I cut it as I like 【ツ】ƗƗє²² ƗƗє²² ƗƗє²²【ツ】 ). But again, it is depended on the length of the clip used and how fluffy that you wanted it. The more fluffy, the longer you will need the ribbons.
2. Tie the ribbon on one end of the clip (near the closed end), using wire (wrap 2-3times to ensure it is well fasten and tuck one end of it tidyly). You would not want the wire to stick into your kids' scalp, would уσυ? Do not cut the other end of the wire (it'll be used to tie the loops)
3. Make a loop and wrap it with the wire, 2 times tightly to the clip. Repeat until the end of the clip. Make sure the size of the loops are same and always wrap the wire closely (tightly against one another...(>_<、) pheω...(・ω・`メ)(-ω-`メ) I don't really know how to explain it but I hope you get the idea by looking at the pictures)
4. Near the end of the clip (the open end), make sure you still have some ribbons left (around 2-5cm). Tie the wire tightly and tuck the rest of the wire below the ribbons. Glue the ribbons to the clip, to secure the wire
5. Since I made this for my girls, so I attached another ribbons inside the clip (to cover the wire wrapping). As you can see on the pic, I used my left-over ribbons from my previous project (it was too short to be used, but I couldn't throw it away)
6. The last step is to open the loops (scatter it around...no rule here, just let your fingers work the magic)
And now...I have colourful fluffy bows...more awesome than the one I saw @the store *winking* I think these bows will be perfect presents for my girls, they had been studying so hard this past week for the exam...加 油 girls!
No comments:
Post a Comment