Second monthly exam has
passed and now it’s the season for school’s projects. My oldest daughter had a
felt project for her art subject, making something (can be anything - free to use your imagination) to be hang
in the car-rear-mirror. Since it’s almost Halloween day, so I thought about Halloween theme for the project. Here was what I designed for her originally (I helped
her drawing the pattern and stitching part, the rest was done by her…she took
forever to stitch 1 body phewww).
 |
| Yay...we are ready for Halloween |
What do you need:
§
Ribbon
§
Various colours of felt clothes
§
Glue
§
Needle and
thread
 |
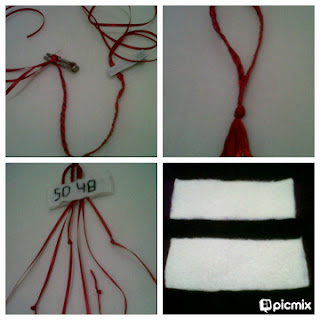
| Step 1 - 4 |
 |
| The mini plushies |
How to:
1.
I make and cut
pattern based on the design drawing (one animal was about 5cm height).
2.
I cut 3pieces
of ribbon, each 50cm. I leave the first 15cm loose and then wave/plait for
another 20cm and leave the rest loose. I make a knot to fasten the plaited
ribbon
3.
I cut 2pieces
of rectangle (white felt) for the name plate. I sew the name on one piece and the class on another. Then I sew both pieces together, by attaching the knotted ribbon in
the top middle of it and let the loosed parts out from the bottom of the name plate
4.
Then I make
another knots from the loose ribbons (to be inserted into the mini plushies)
5.
Cut the felt
clothes based on the pattern (remember to cut the front and back bodies).
6.
Glue the
eyes/mouth/beak/feet/wings onto the body. For girly touch, you could add eye
lashes (stitch it using either black or white threads) or ribbon. You could stitch the
mouth as well instead of gluing the felt cloth.
7.
Glue (or
stitch it) together the front and back bodies. Remember to attach the knot
ribbon into the top middle of the head. Leave some space to insert the polyester fiber
and then fasten it.
8.
Now you have
Halloween ornament ready to be hang around in the house…or in the car J
 |
| For my youngest one...to be hang on her lunch box bag |

No comments:
Post a Comment