Showing posts with label Ribbons...bows n clippie. Show all posts

Wednesday, December 5, 2012

Chubby Flower Hair Accessories

It's been weeks since the last time I opened my craft boxes. These few weeks have been the busiest days for me...not that I was working...but I was busy typing the practice papers for my girls. They are having their exams now and by 2nd week of Dec, it is holiday уααу!└(^o^)┘ \^o^/ └(^o^)┘уααу!
The cute chubby hair accessories

So when I finally had time, I started collecting my scrap fabric. I got some batik fabric (from the too-long-belt of my batik dress). So look what I made out of it...fancy hairclips with Indonesian traditional patterned cloth. If you are interested to make one for you, please kindly check my previous post. I'm pretty sure I wrote some tutorial re to it :-)
I got an idea from this hairclip (I bought this one)
My batik hair accessories

But the best ones are these chubby flower hair accessories (and it comes with a matching set уααу!└(^o^)┘ \^o^/ └(^o^)┘уααу! ). It involved lots of stitching but I bet...it worth the effort *grinning* I found an old clothes of my girl with pretty pattern on it and I cut it into 5 circles (around 7cm in diameter). I stitched the edge of the circle (one by one) and I pulled the thread so the circle was a bit in bowl-like-shape. I inserted some polyester fibre and pulled it firmly. If you don't have polyester fibre, you can cut your scrap fabric smaller to replace it or use bean bag/foam balls. Then I fastened the opening by stitching it altogether. Afterward, the fabric would look like a soft ball (with a bouncy feel on it)

After I made 5balls, then I stitched all the balls together (from side to side) for form flower petals. Next I glued/stitched the applicant right in the middle of the petals. Here I used (again) old button but you can put anything (beads or fake pearl). Then I attached (by gluing) the hair rubber or lined hairclip onto the back. Pretty cute isn't it? My girls adore it...they asked me for another already...they said...the chubbier - the cuter *grinning ear to ear*
some snapshots on my batik hair accessories

Wednesday, November 21, 2012

Easy bows


This time I was quite lazy do something. But my girls, are getting used to get some surprise after school, kept on nagging me for new bows, especially we just bought new ribbons few days before. So I made this simple one just to satisfy them


I was using barrette clip, so I disassembled the clip prior lining it up. I used two ribbons (about a yard length) and fold it few times (any length is fine). Fasten the middle using either craft wire or strong thread. Use another ribbon and make a knot (pls refer to the above pic). Afterward, attach the knotted ribbon onto the folded ones (right in the middle, to cover the wire or thread). Glue the ribbon onto the clip altogether, to fasten it and you are done   :-) Simple and very easy


Wednesday, September 26, 2012

Pretty flowery hairclip

At first, it wasn't my intention to make another hairclip. I was altering my dress. It was ok but too short for me (I wasn't confident enough to wear short dress...mind you...my thights are quite big 【ツ】ƗƗє²² ƗƗє²² ƗƗє²²【ツ】). So I cut few inches from the bottom, to create a new-looking-top from it. After I finished fixing it, I had this mess round my room. Since it was still early, so I began working on the ribbons...again...well the newly purchased ribbons were just laying around on the shelves. It was kinda hard to ignore it...I felt this tugging sensation to create something different.


You will need:
- yard ribbons. I used different tones/shades for these ones
- hairclip
- hot glue gun
- black felt
- button or any decoration ornament

Step 1 - 2


Step 3 - 4


Step 5 - 6

How to (for the purple flower):

  1. Cut the ribbons into 3 different lengths (since I used 3 ribbons per set), but you are free to use either one or more, for a set. Cut for about 10-15sets (depends on how big of the bloom that you wanted)
  2. Glue together all the ends (glue per set). It would help a lot if you have somebody helping you preparing the ribbons. If you are working alone, i would recommend you to prepare the ribbons (with helps of clips) prior gluing (or you have to put the hot gun on and off several times to avoid hot dripping glue)
  3. Cut 2 small circles from the black felt (it doesn't have to be a perfect circle...no worry)
  4. Glue the ribbons (one by one) onto one circle 
  5. Glue the button or decoration ornament in the middle of the flower. 
  6. Glue the flower onto the hairclip. Fasten it by gluing another black circle onto the inside of the clip (look at the pic)


Hiks...my sore thumb

When I did the 6th step, I burnt my thumb ‎​(>_<、) pheω...‎​(・ω・`メ)(-ω-`メ) and (╥﹏╥) нιкѕѕѕ...(๑•́ ₃ •̀๑) ...it was painful ('cenat cenut') and I quickly applied the white egg (heard that it is good for burnt skin). But it doesn't stop me to move onto my second hairclip. But I learned my lesson (in a hot painful way)...so I was quite careful from then on...I started to use chopstick end to fasten the glue LOL.
Step 1 - 4


Step 4 - 5

For the pink flower, it is almost similar with the above one, with some alteration. Step 1 is the same, but for this flower, I only used 2different tones of ribbons (so 2different lengths). Then I twisted each ribbon and glue the ends together (do it per piece of ribbon). Step 3 and 4 are the same, however for step 4, glue the bigger/longer ones and glue the shorter ones on top of the longer ones (look at the pic pls). The rest is the same as the above one.

Last step

There is another way as well to make this flowery hairclip:
  1. Fold the ribbons (about 15 times). If you are confused, please refer to the picture
  2. Stitch the end of it together and pull the thread. Fasten it (as per the picture)
  3. Prepare the black felt (2 small circles). Put glue on one of it and put the stitched ribbon onto it. Arrange the ribbon into flowery shape
  4. Put button or decoration ornament on top of it (in the middle of it)
  5. Lastly, fasten the bow onto the hairclip (like usual)


Step 1 - 3


Step 4 - 5
See...it's simply twisting the ribbons around to create another look of flowery hairclip :-)


Wednesday, September 19, 2012

Flowery bow with wire ribbon


Lets play with the wired ribbon now. I used to get confused…bout what to do with my wired ribbon but now…I couldn’t stop myself. It was so addicting he he he. The main ingredient is wired ribbon, any type…any kind…small or big…plain or pattern…one side wired ribbon or both side wired ribbon…you could choose whatever you like. And it is simple too…otherwise I wont make so many of it he he he. Prepare about 50cm of ribbon and fasten one end of it (you could make a knot or fold the wire few times).


First option
Pull both of the wires from another end so the ribbon is creased and fastens the wires (fold it few times over the end of the ribbon and cut the rest of the wires). Tidy up the creased ribbon. Prepare a felt in circle shape (any size and colour is fine). Put some glue onto the felt in circular shape, and stick the creased ribbon onto the felt. Continue until finish (the core).


Second option
Exactly the same as the first one, however I only pulled one wire instead of both. Then I fasten the pulled side of ribbon onto the felt in circular shape until finish.


Third option
Pull one wire from another end so the ribbon is creased and fastens the wire (fold it few times over the end of the ribbon and cut the rest of the wire). Twist the ribbon in circular motion until the end and fasten it (either using glue or some stitches)
4th option

Fourth option
If you dont have wired ribbon, no worry. Take your ribbon and sew on one side along the ribbon. After it, pull the thread altogether and fasten it. Looks like wired ribbon isn't it?

I made another version from wired ribbon

Easy…yet beautiful flowers bows ready for my girls   J


Wednesday, September 12, 2012

Lollypop clippie

Phewwww...I have a terrible headache...all due to the traffic jam @Mangdu. I spent more than an hour there, when I normally pass it in only 5mins (perhaps because of the construction of busway). While I was stuck in the middle...i remembered a sticker on car, saying "true man uses three pedals car". I bet, at this time, whoever the owner of that car would have wished for a matic transmission car   ;-)   And I was glad, I had something sweet like a lolly to nibble during the unbearable traffic (to calm my growling stomach he he he)


Few days ago, when I was shopping, I saw candy store which sell lots of lolly. Thought of buying some for my girls but after I really considered it, I cancelled it. I had another idea, giving a lolly which definitely doing nothing bad for my girls’ teeth   *grinning*


So, when I was home…I set to work. Here are things that you need:
§         2 different colours of ribbon (about 50cm)
§         Alligator hairclip (line it first)
§         Glue. I was using hot gun glue
§         Decoration: here I used a blink-blink ornament and a small knotted bow


Steps:
1.      Glue together the ribbons at one end
2.      Twist the ribbons together tightly (like doing some paper quilling…which gave me another idea to turn some of my paper quilling models into bows   *winking*). Put some drop of glue to fasten the twisting for each 10cm
3.      Glue the end together so the result will be a circle
4.      Glue the circle/lolly onto the opening end of the clip
5.      Add the decoration

And now you have a lolly on the hair instead of inside the mouth...definitely healthier   :-D


Thursday, September 6, 2012

Dragonfly Clippie


Remember the last time I made caterpillar clip for my niece. This time I (initially) intended to make a butterfly to go along with the caterpillar (as a series of metamorphosis), however it turned out to looks more like a dragonfly instead of butterfly. My girls still like it though…


Step 1 - 6


I used:
§         4 different colours of ribbon (black, pink, orange and yellow)
§         Alligator clip (line it first)
§         Hot gun glue
§         Needle and thread


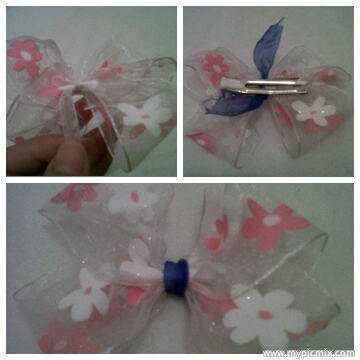
Step 7 - 10 (upper left - upper right - bottom right - bottom left)


How to:
1.      Cut the black ribbon for the antennas (2 pieces). Brush it with transparent nail paint so it doesn’t fray (or you could use anti fray if you have)
2.      Cut the pink ribbon into 3 pieces with 10cm long for each. Glue together the end (or you could stitch it using some thread). Then make a braid/plait and glue another end together. Stick both ends into the plait (so it doesn't show - covered)
3.      Cut the orange ribbon into 2pieces of 10cm long and 2pieces of 8cm long
4.      Cut the yellow ribbon into 2pieces of 9cm and another 2pieces with 7cm long (you could play with the colour as you wish)
5.      Take one 10cm and one 9cm ribbons and fasten the ends together (either using glue or thread). Continue with another pair. Please refer to the picture if you are confused
6.      Take one 8cm and one 7cm ribbons and fasten the ends together and continue doing the same for another pair
7.      Glue the antennas onto the opening end of the clip
8.      Glue the wings onto the clip
9.      Glue the plaited ribbon on the top of the wing
10.  You could add some eyes for decorations

Isn't it a cute clip for your dear sweetheart?


Tuesday, September 4, 2012

It's simple bow...again

I am waiting for the 2nd season of MasterChef in another 10mins while I am writing this. Btw, I write most of my blog on my BB so that I can write anytime and anywhere, before send it directly to my draft folder on my blog. I flicked over the tv channels, then settled on Chaplin and Co, an animation (cartoon) at MNCtv. I just realized that most of tv animations lately are mute ones, no understandable language is spoken...just a simple humming or murmur (like Oscar or an animation of worm which I forgot the title). Those animations are simple (compared to ones played at cinemas) but still hillarious and entertaining. I can understand the plot perfectly even without the dialogue. Well...it shows that even simple thing can be good too, rite (っˆヮˆ)っ
Such a sweet bow   :-)

So, rather than fancy bow which looks so complicated to duplicate, now I made another simple bow. I can't help it...I keep making bows (っˆヮˆ)っ нa헤нa헤нa헤. I simply just twisting the ribbons all the time, finding a new way to make a bow. So here it is...don't worry, it's so simple that everybody can make it.
Again, upper left to upper right, then bottom right to bottom left

You will need three things only; big and small ribbons, hairclip, and glue. First, cut and make a twisting loop of the ribbon. You could glue the ends onto the middle of it (or you can use another clip/pin needle to maintain the hold). Second, bring the mid of the loops to the core (where you put glue/clip). Third, slowly, make a crease that you wish and tie the crease using another smaller ribbon. Wrap it around and fasten it to the clip. You can use glue to ensure that it is well-fasten.

It's done...simple yet quite good too rite :-)

Friday, August 31, 2012

Big bows from used cloth

Looks good right   ^.^

Hi, I am sorry...been neglecting my blog lately. It is final exam weeks and I have been busy preparing and helping my girls. So I guess...I am gonna publish only one post per week.   :-)  After taking break for weeks, here is my new creation of bows. As you can see from the picture, I didn’t use any ribbons here but used old clothes instead. I cut lots of small circles (diameter of 5cm) out of the old clothes (pity…I don’t have the one with pattern). I made around 18 circles. Beside it, you will need black felt (cut into 2 small circles), hair clip, needle and some thread. Yes, less hot gun glue use for a while  *grinning*


I bought this @Artbox...my inspiration source   >.<


Tada...i made so many he he he


How to:
  1. Make triangle (fold it anyway you like) of all circles
  2. Stitch the triangle one by one onto the black felt (cover the black felt in circular pattern)
  3. Continue until you have stitched up 2/3 of your circles
  4. Stitch together 3 triangles and sew it to the black felt. Fasten if required
  5. Stitch the last 3 triangles and again sew it to the black felt.
  6. Fasten the thread (make several knots to ensure it is well-fasten) on the back of the black felt
  7. Glue the back of the black felt on to the clip. If you are using barreta clip (like me), dissemble the clip first prior gluing.
  8. Glue another black felt on top of the clip (to secure the clip) and re-assemble the clip (for barreta)
  9. If you are using hair rubber band, you can stitch the rubber band onto the black felt and glue another black felt on top of the rubber band
  10. Last step is to arrange the flower petals as you like


Step 1

Step 2 - 3

Step 4 - 6

Step 7 - 8 (for using barreta clip)


Step 9 - 10 (for using hair rubber)


There is another method to make this flowery bow:
  1. Prepare around 10 – 14 small circles (I used the leftover circles)
  2. Set aside 2 circles and fold the rest (into half circle)
  3. Put 1 circle then add on top of it, the fold ones. Do it one by one, by rotating the half circle (please look at the picture provided)
  4. At the end, add on top of it, the last circle
  5. Stitch the middle of the circle. Please ensure that you stitch all of them (including the fold ones)
  6. Fasten the thread.
  7. Now you can either fasten the flower onto a hairclip or hair-band or hair rubber or pin (for bodice corsage) or even onto small ribbon (for wrist corsage).  Don’t forget to arrange the flower petals.

Step 1 - 4
Step 5 -  7


Awesome isn’t it   :-D 

Wednesday, August 29, 2012

Simple bow

Have you seen the latest Magnum ice stick commercial advertisement (ca)? At first, I thought it was some new release movie trailer, especially with the Academic Award winner actor and actress in it. At the end, it turns out to be the new golden chocolate with caramel Magnum. Ehm, I love choc but I hate caramel the most…Seeing the gold doesn’t appetizing. Perhaps I’m more the classic type   

Talking bout some classic thing, I made this classic bow quite sometimes ago, but I just had time to write it now (sometimes I forgot to take a pic when I make something...but now, I always has my ipod or blackberry nearby). It is so simple so you will be able to create yours without difficulty.


As usual, you will need ribbons (I used sheer organza ones), hairclip, thread and needle, pin needle and scissors. You can add other ornament for decoration too (I use small silvery beads).

Step 1 - 4

How to:

1. Fold the ribbon like shown on the pic. You can use pin needle to secure the folds. Fold it so you have around 3-5loops.
2. Insert the thread into the needle and make a knot on the end of the thread. Stitch the middle of the ribbon (as shown by the pic).
3. After finish stitching, pull the thread so the ribbon will crease.
4. Tidy up the loops as you like and wrap the thread around the middle of the ribbon, at least 2times. Make a knot to secure the wrapping.
5. Prepare another smaller ribbon. If you want, you can insert the beads into this ribbon.
6. Wrap the smaller ribbon around the big one, to cover the thread, and tie it around the clip. You can glue it as well, to ensure it is well-fasten.
Step 5 - 6

You can attach the decoration (use glue) onto the ribbon, as you wish. Now you have your bow ready for use.