 |
| Look at my big eyes...hoot...hoot... |
 |
| The sketch and the patterns |
 |
| The fabric and cloth cut out of the patterns |
 |
| The first 3 steps |
 |
| 3rd - 6th step |
 |
| 7th step |
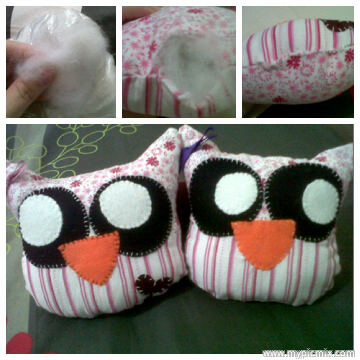 |
| The last step so the owl will be plushie he he he |
Firstly, I sketched the
owl as I wished. Then I made the pattern according to the drawing. I cut out
the fabric (I used my girl’s old dress which was still good – I was torn
between using this dress for my owl or giving it as a hand-me-down stuff to my
laundry maid) according to the pattern. Then I sew it using hand. Yes, using
hand…I have this big sewing machine at home however I had bad experience using
it. It runs so fast that I almost sew my fingers phewww…scary. Since then on, I
would never touch it and rather sew by hand (though a little bit untidy and
troublesome…but I guess…I need my complete set of finger rather than anything he
he he). Later on, my hubby bought me this compact hand-sewing-machine which
works like a staple. However (there is insufficient manual…mind you…it’s only
12k per piece), I couldn’t use it at all. It can sew alright but the thread
sewn was pretty loose and come off easily. So, until I figure it out how to sew
with that machine, I was sewing my way with my own hand.
 |
| The machine that I have at home |
 |
| The cheap but unworkable sewing machine |
Here is the list of
pattern that you might need to make your own owl plushie:
o A set of black-part eyes (felt cloth)
o A set of whiten-part eyes (felt cloth)
o A beak (felt cloth)
o The body, you could use felt or any fabric (pattern
fabric looks fanciful). On my drawing, I have patterns for the upper front
body, bottom front body and back body (I used different pattern for the upper
and bottom front body). Remember when you cut the fabric, always give about 1cm space for sewing.
o Ornament such as ribbons, heart, bow, wings, anything
that you want
 |
| These ones serve as congratulation presents for passing their aikido exams |
How to:
o Sew together the upper front body and bottom front
body. If you are using only front and back body, then you could skip this step
to the next one
o Sew the whiten-part of the eyes onto the black
ones.
o Then sew the whole eyes onto the upper front body
proportionally (or according to your sketch)
o Sew the beak onto the body
o Sew any ornament that you wished to attach onto the
owl
o After everything is attached, then sew the front
and back body together (inside out). Make sure you leave some space to flip the
fabric and to fill the plushie
o Turn it inside out and fill the plushie with
polyester fiber or beanbag (or you could cut/shred unused cloth/fabric for the
filler as well…use whatever on hand dear J)
o Sew together the ‘hole’ tightly and neatly
 |
| Look! I made this cute sweet little monsters too for my girls. |
Congratulation, you just
make your very own owl plushie J My girls
love it so much that they always bring the owlie to bed (they even named it he
he he)
No comments:
Post a Comment